Host a Public Wordpress Website on Raspberry Pi
 Updated
Public Wordpress Website on Raspberry Pi
A Raspberry Pi is a popular low cost device that can be used to host a website.
Wordpress is the most popular content management system on the Internet.
There are a number of "how to" guides on the Internet for hosting a Wordpress site on Raspberry Pi, but those guides don't work with some of the more complex Wordpress themes, and they stop short of using the Pi to host the actual public website.
This article will walk you through the details of getting Wordpress running on a Raspberry Pi, as well as how to host the public website on a Raspberry Pi.
Environment and Pre-requisites:
This is the setup used in this article. Your setup may be different - if so, some steps may not be exactly the same.
- Raspberry Pi 4 Model B with keyboard/mouse/LCD panel attached (or VNC enabled)
- Clean install of Raspbian via NOOBs
- Connected to WiFi, new password for Pi user
- Enable SSH on the rPi
- This article assumes MacOS for main computer
- Find the IP address of your Raspberry Pi and open a terminal session and SSH into the Pi (e.g.
ssh pi@192.168.0.123)
Installation
- Make sure you Raspberry Pi is updated
- Open up your SSH terminal session and type:
sudo rpi-update
sudo apt-get update
- Install your LAMP stack
Wordpress relies on the tried and true LAMP stack - we have to install each of the pieces.
L - Linux. You should already have Linux installed (per the Pre-requisites above)
A - Apache. Apache is the most popular web server in use today. In your SSH session, type:
sudo apt install apache2 -y
M - MySQL. MySQL is super common database. However, the Raspberry Pi distribution needs to use a MySQL variant, MariaDB. In your SSH session, type:
sudo apt install mariadb-server -y
P - PHP. PHP is used by Wordpress as its website scripting language. In your SSH session, type:
sudo apt install php -y
We also need to install some additional PHP modules - one of which is required for basic operation (php-mysql) and others which are required for more advanced themes. In your SSH session, type:
sudo apt install php-mysql php-curl php-zip php-pclzip php-xml -y
Restart Apache for the updates to take effect. In your SSH session, type:
sudo service apache2 restart
- Install Wordpress
Installing wordpress requires some file management and the creation of a database.
First, let's clean up the document root, put Wordpress there, and set permissions. In your SSH session, type the following commands, one after the other:
cd /var/www/html/
sudo rm *
sudo wget http://wordpress.org/latest.tar.gz
sudo tar xzf latest.tar.gz
sudo mv wordpress/* .
sudo rm -rf wordpress latest.tar.gz
sudo chown -R www-data: .
sudo chmod -R 775 /var/www/html
Next, let's configure the database. In your SSH session, type:
sudo mysql_secure_installation
Answer "Y" to all four questions
Then, in your SSH session, type:
sudo mysql -uroot -p
Once you do that, you'll be in the MySQL command line. Enter the following commands, one after the other (NOTE: You should use a custom password instead of password):
create database wordpress;
GRANT ALL PRIVILEGES ON wordpress.* TO 'username'@'localhost' IDENTIFIED BY 'password';
FLUSH PRIVILEGES;
exit
Restart Apache to run Wordpress! In your SSH session, type:
sudo service apache2 restart
- Configure Wordpress
Now that Wordpress is running, we can configure it via a browser. While you could got to http://localhost from the browser on the Raspberry Pi, it is more convenient to use the browser on your PC to set it up - just open your browser on your computer and go to your Raspberry Pi's IP address - it will show the Wordpress configuration screen.
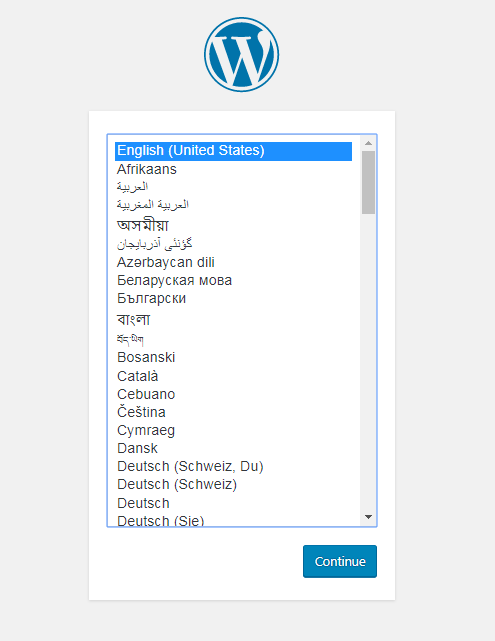
Choose your language and click Continue. Next, you'll get the database configuration screen:
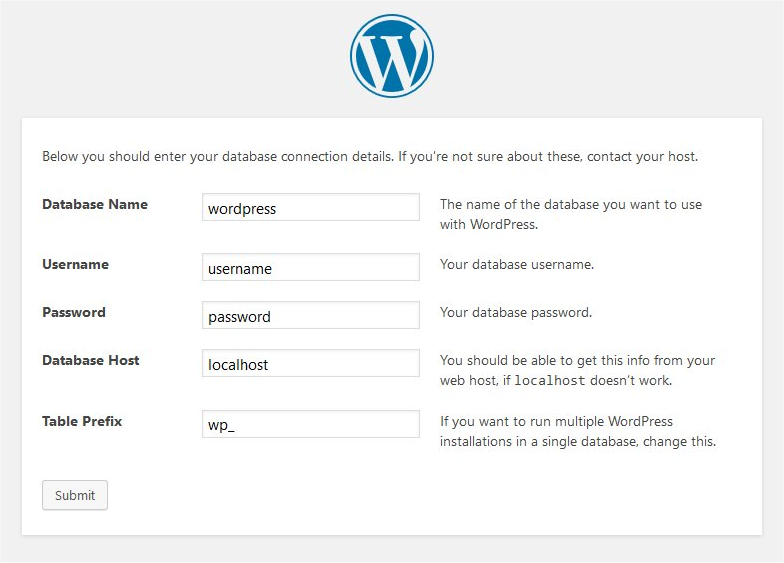
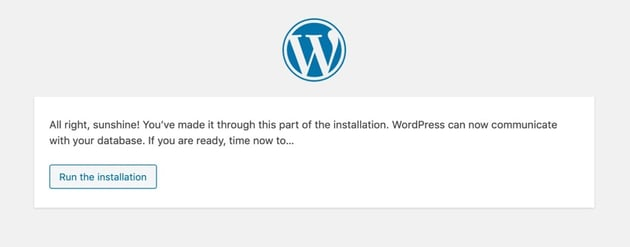
Fill it in with the credentials you created on the MySQL command line in step 3. If you've managed to input the right info, you'll see something like this message:
Finally, you'll be given a configuration screen to setup basic information, and your first user, for the Wordpress website:
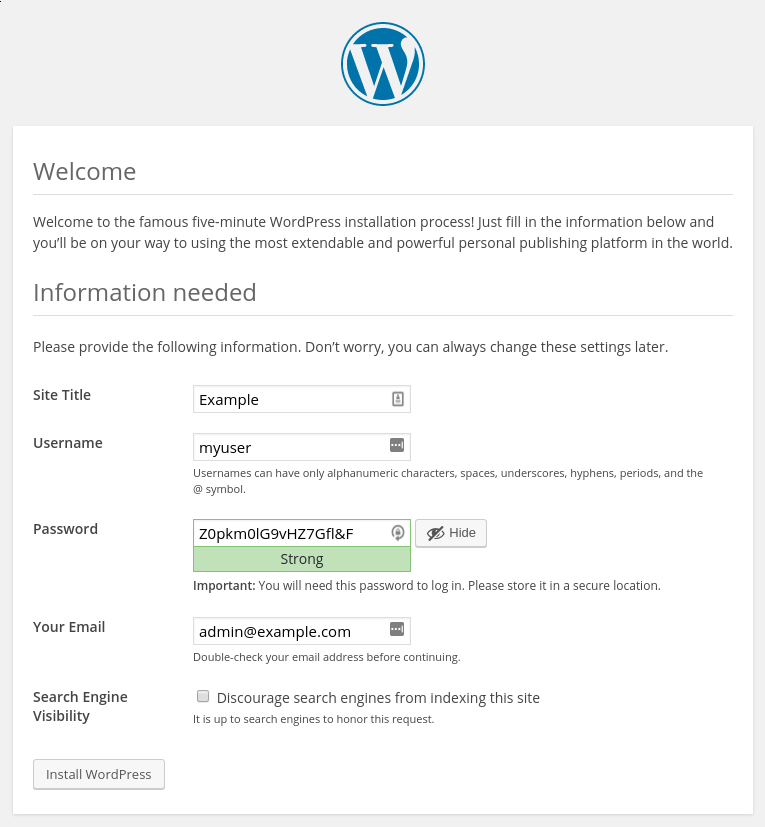
Fill it in as desired - don't forget to write down / save the Username and Password you give it - you'll login to Wordpress with those credentials.
Once done, you'll be taken to the Wordpress admin area and you can begin configuring all the details for your website! If you hit issues at this stage, skip down to step 6 to check the special configuration suggestions out.
- Publish the Website
At this point, you're running Wordpress locally on the Raspberry Pi, but no-one else in the world can easily appreciate it. The next instructions will show you how to get your website setup for publishing via Diode and then how to publish your website publicly or privately.
Setup for publishing
When publishing your website with Diode, you will piping http://localhost (or the Raspberry Pi's local IP address) through to an https://<your subdomain>.diode.link, or http://<your domain>. Because of this, there is a mixed content issue - Wordpress is serving content to http:// (non encrypted), but it is published as https:// (encrypted). This "sort of" works without any further configuration, but a lot of static content (styling, images) and some javascript files won't be accessible to your users since their embedded links are all http:// - the website content will be there, but it will not look right. We have to fix the mixed content links. There are a few ways to do this, but the easiest way we've found with Wordpress is the "Relative URL" plugin by "Tunghsiao Liu".
Search for "Relative URL" in the Plugins menu, install it and enable it. This plugin removes the "http://" from URLs so that they are served on top of whatever the base path is.
Public publishing via Diode
To publish the website via Diode, you will need to download and install the Diode CLI tool. In your SSH session, type:
curl -Ssf https://diode.io/install.sh | sh
Then, use the Diode CLI to publish the website! In your SSH session, type:
diode publish -public 80:80
Amongst other messages, you should see something like this:
INFO HTTP Gateway Enabled : https://0x212336d3f56040685340643159670858c4581121.diode.link/
Your website is now publicly live at https://0x212336d3f56040685340643159670858c4581121.diode.link/! This URL is not super attractive, however, so you can register a BNS name and even point a full domain name at the BNS so your website can be found at, for example, https://mydecentralizedwebsite.com.
The final step here is setting your Wordpress Address and Site Address to your remote URL so the admin page will render. To do that, go to your https://locahost/wp-admin page on the machine's browser, and go to Settings and set those fields to the Gateway Enabled link (note the client address below has been shortened - it should be the full address or the BNS name you've registered):

Private publishing via Diode
You may want your Wordpress website to ONLY be accessible to specific people. While some themes can require a visitor to enter a login, you can make this even more secure by requiring the visitor be uniquely authenticated with Diode in order to see the website. This is called Private Publishing, and it works sort of like a maintenance-free VPN.
There are two sides to private publishing - the publishing side and the viewing/user side. Both need to install the Diode CLI (see the curl command above).
Have each of your users install the Diode CLI on their computer and type diode time in a terminal session. This will create an output that includes something like this:
INFO Client address : 0x212336d3f56040685340643159670858c4581121
Have them copy the client address value and send it to you.
Then, use the Diode CLI to publish the website privately to them. In your SSH session, type:
diode publish -private 80:80,0x212336d3f56040685340643159670858c4581121
If you have more than one user, just add successive commas and client addresses.
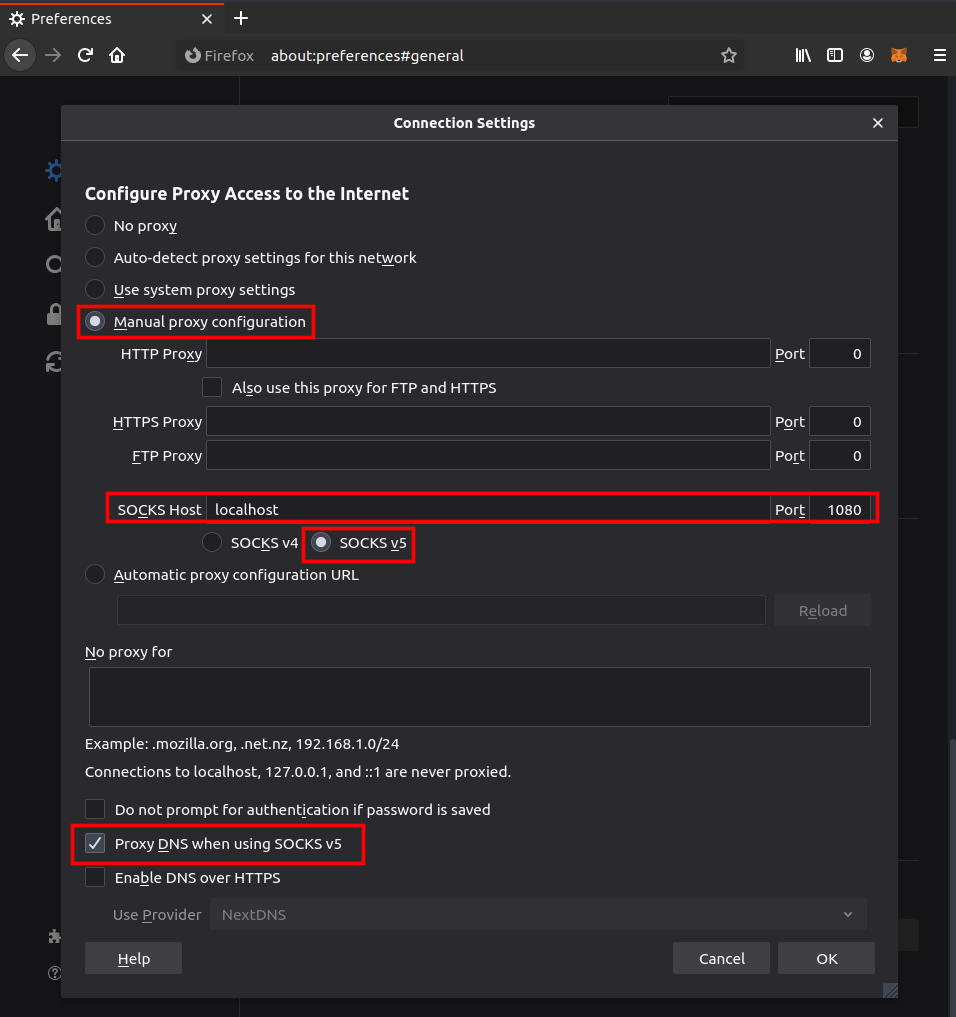
In order for your users to access your website, they will have to type diode socksd in their terminal, and then configure their browser to use their Diode CLI as a proxy to access your website. For example, in Firefox, they would need to go to Preferences -> Network Settings and select manual proxy configuration. Set as proxy server localhost and port 1080. Ensure it’s using SOCKS v5 and check Proxy DNS when using SOCKS v5.
Then, they can access your website by typing in the <client address>.diode (e.g. 0x212336d3f56040685340643159670858c4581121.diode from the example above), or, if you've registered a BNS name (e.g. mydecentralizedwebsite), they can type mydecentralizedwebsite.diode to see your website. Only the users who have the client addresses you've published privately to will be able to see your website!
- Special Configuration Steps
If you're happy with the default themes, you should be good to go. However, it is possible you need to install a custom theme that has some special configuration requirements.
Theme too large
If your theme is over 2MB in size, when you try to upload it, you'll be given an error that it is too big. To increase the upload size, we have to modify the upload_max_filesize setting in php.ini. In your SSH session, type:
sudo nano /etc/php/7.3/apache2/php.ini
Note that the 7.3 is the PHP version installed. If you don't know the version, just type php -v in the SSH session and substitute whatever that is for the 7.3 above.
Once the php.ini file is loaded in nano, type Ctrl-W and enter upload_max_filesize to search for that setting. It will be set to 2MB - change it to something larger - 20MB, say, and save the file.
Restart Apache for the configuration to take effect. In your SSH session, type:
sudo service apache2 restart
Custom redirects
Some themes try to redirect the browser to a specific URL path. Apache is not setup by default to enable that (although, interesting note, the docker version _is_ configured that way by default).
First, we have to enable the rewrite module. In your SSH session, type:
sudo a2enmod rewrite
Next, we have to allow Wordpress to override pertinent configuration parameters. We do that by adding an override section to the Apache configuration file for the enabled site. In your SSH session, type:
sudo nano /etc/apache2/sites-enabled/000-default.conf
You'll see a section that starts with <VirtualHost *:80> . In that section (before the </VirtualHost>) add the following text:
<Directory /var/www/html>
        Options Indexes FollowSymLinks
        AllowOverride All
        Require all granted
</Directory>
Save and exit the file.
Restart Apache for the configuration to take effect. In your SSH session, type:
sudo service apache2 restart
Other problems
If you hit other problems with your Wordpress installation, check the Apache error logs by printing it to your terminal:
cat /var/log/apache2/error.log
The latest error log entries may give you a hint as to what is going wrong - you can search the Internet for the error or possibly deduce the missing package or configuration from the text there directly.