Host a Website with Ghost
 Updated
By using Diode, we can use a Raspberry Pi to host a website that anyone in the world can access.
Ghost is a great little CMS and web hosting platform that is light weight and easy to use. This article will run you through steps to get Ghost running on your Raspberry Pi so you can start publishing Web3.0 websites and content.
Environment and Pre-requisites:
This is the setup used in this article. Your setup may be different - if so, some steps may not be exactly the same.
- Raspberry Pi 4 Model B with keyboard/mouse/LCD panel attached
- Clean install of Raspbian via NOOBs
- Connected to WiFi, new password for Pi user
- Enable SSH on the rPi
- MacOS for main computer
Installation
- Install the Ghost CLI
The Ghost CLI (Command Line Interface) will help you install Ghost.
- Open up your SSH terminal session and type:
sudo apt update
sudo apt upgrade
sudo apt install nodejs
sudo apt install npm
sudo npm install -g ghost-cli@latest
EBADENGINE Unsupported engine . In this case, check what version of node it "requires" and install that. Usually, the easiest way to manage node version is with nvm. To install nvm, you can
sudo wget -qO- https://raw.githubusercontent.com/nvm-sh/nvm/v0.39.2/install.sh | bashThen, you can do an
sudo nvm install 14.17.0(if it required node 14.17.0, for example)Then re-run
sudo npm install -g ghost-cli@latest
If you didn't install nvm to sudo/root, you may need to follow the tip to add symlinks to make your normal user and sudo/root use the same node version: https://stackoverflow.com/questions/21215059/cant-use-nvm-from-root-or-sudo
- Install Ghost from the CLI
Now that the CLI is installed, you can install Ghost locally.
- Open up an SSH terminal session
- Make a new directory for your Ghost installation and go into it
mkdir ghost
cd ghost
- Install ghost
ghost install local
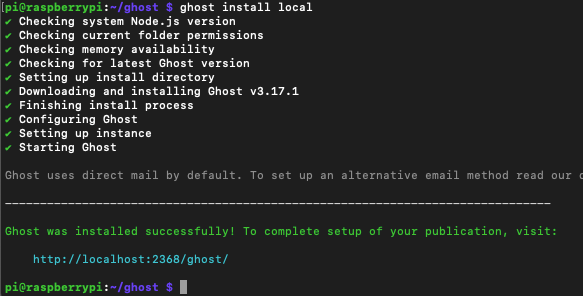
- Type "ghost ls" to see your ghost configuration

- Try Ghost Out
Ghost is now running on your rPi, but you can't yet see it from your computer - it is running on the rPi's localhost. If available, switch over to your rPi keyboard/mouse/LCD setup and pull up a browser and type "http://localhost:2368" to setup and view your Ghost website.
To interact with it remotely, you can either reconfigure the URL to be the rPi's IP address (it will then be available on your local network), or you can run the Diode Client on the rPi to view and manage the website anywhere in the world.
IMPORTANT NOTE: make sure to configure your URL or your images won't work correctly!
ghost config --url http://192.168.50.21
or
ghost config --url http://<your domain>.diode.link