Enable SSH
 Updated
It is a pain to switch back and forth between a computer UI setup and the Pi setup. We can enable SSH on the Pi it can be controlled remotely from the computer. However, SSH is not enabled on the Pi by default, so we have to do that first.
Environment and Pre-requisites:
This is the setup used in this article. Your setup may be different - if so, some steps may not be exactly the same.
- Raspberry Pi 4 Model B with keyboard/mouse/LCD panel attached
- Clean install of Raspbian via NOOBs
- Connected to WiFi, new password for Pi user
- MacOS for main computer
Setup SSH
The steps below are a concrete example of the official Raspberry Pi instructions.
- Enable SSH
- On the Pi's keyboard/mouse/LCD setup, open a terminal window and type:
sudo systemctl enable ssh
systemctl start ssh
- It will pop up a box asking for your password - enter it, and SSH will be enabled
- Find your Pi's IP address
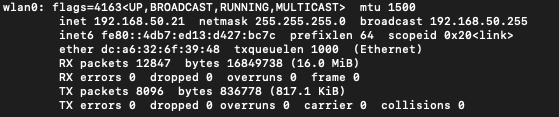
- Find your IP address by opening a terminal window on the Pi and typing "ifconfig" - if you're using WiFI, the inet address under the wlan0 interface will show your IP address - mine is 192.168.50.21
- SSH into your Pi
From your computer:
- Open a terminal window and type (replace the IP address with your Pi's IP)
ssh pi@192.168.50.21
- It may show you a warning (type yes) and will ask for your password. Once you've entered your password, you'll get a "pi@raspberry:~ $" prompt - you're in!

That's it - you can now access your rPi remotely (as long as you are on the same LAN).
NOTE: If you want to access your rPi over SSH even when you are not on the same LAN, see the article about enabling SSH over the Diode Network