Use your Raspberry Pi as a Remote File Server / Backup Device
 Updated
Diode Drive can turn your Raspberry Pi into a decentralized file server and backup device - one that is much more secure than cloud-based alternatives, and one that is always available no matter where you are in the world. This article lays out the step by step configuration required to do that.
Once you've configured a Raspberry Pi as described below, you can put it under your desk, in your closet, or in some other secure location anywhere in the world, and basically forget about it. It will securely keep a copy of all files in your Diode Drive Zones, and you'll be able to remotely administrate as needed. We have setup many Pis with similar instructions and they reliably and silently just work as anywhere, always-on, file availability and backup devices.
General Configuration
- Buy a Raspberry Pi 4 (any will work, however, including a Pi zero!) - recommend getting a case and fan to keep it cool / operating for a long time
- Buy peripherals if you don't have them handy: 32 GB micro SD card, uHDMI / HDMI convertor, large USB flash drive (e.g. 1 TB is fine), USB keyboard/mouse (the kind with a little USB wireless dongle is nice)
- Use Raspberry Pi imager to program the 32GB micro SD card with default Raspbian
- Plug in uHDMI cable, power, USB flash drive, and wireless keyboard USB dongle and boot up the system
- Select US English settings, Denver timezone
- Set password, save details
- Run software update
- Restart the Pi
- Connect to local network (Ethernet cable or WiFi)
Enable SSH
Enabling SSH will allow you to remotely SSH into the system to maintain it, if needed.
- Open terminal, type “sudo raspi-config"
- Go to Interface -> SSH -> Enable
- Get IP address: ifconfig -> e.g. 192.168.50.219
- Open Mac/main PC terminal and ssh pi@192.168.50.219 to confirm everything works
Install VNC
Enabling VNC will allow you to remotely VNC into the system to maintain it, if needed.
- sudo apt update
- sudo apt install realvnc-vnc-server realvnc-vnc-viewer
- sudo raspi-config
- Go to Interfacing Options, VNC -> Yes
- Test via VNC viewer (https://www.realvnc.com/en/connect/download/viewer/) on Mac/main PC on the same network as Pi is connected to
- Force enable HDMI even if not plugged in (will let VNC run without a monitor plugged in)
- sudo vi /boot/config.txt
- Uncomment the line “hdmi_force_hotplug=1” by removing the “#"
- Restart without HDMI cable plugged in and verify you can still access via the viewer
Install Diode Drive
Diode Drive enables 256bit encrypted tunnel to any "Zone" the Pi is added to. Whenever a file is updated in the Zone, the Pi will sync it / store it. This allows any given team member to always get the most recent files from the Zone without having to be online all the time, or at the same time as other team members.
- Install OpenGL dependency: sudo apt install libglu1-mesa
- Download Diode Drive for Linux ARM
- Set install file properties to “execute” and install
- Run Diode Drive
- Setup Pi account name (you'll invite the Pi to join a Zone via its account name), print backup code, save details
- Configure the default Zone directory to be the base directory of the USB flash drive
- NOTE: If this is not done, for every Zone the Pi is invited to, you'll have to "Unlink Zone", manually move the folder to the USB flash drive, and then "Restore Zone". If you leave the default directory in the Pi's user home folder, you can only store around 1GB of files before filling up the disk.
Install the Diode CLI
The Diode CLI enables secure remote access to the SSH and VNC interfaces. We'll lock the VNC interface to your PC's Diode CLI address so that the _only_ other system that can get to the VNC interface is your PC. As such, you'll need to install the Diode CLI on your PC (if you haven't already).
- Install diode CLI: curl -Ssf https://diode.io/install.sh | sh
- Use “diode time” to show the Pi's Diode CLI client address, copy it (e.g. 0xa334b4306bdc1c3cda9bf7781faa46f964213144)
- On PC, Use “diode time” to show the PC's Diode CLI client address, copy it (e.g. 0x21334ab7F3d1b549012498c69A4120DE2ff03E51)
- Test it:
- On Pi: diode publish -public 22:22,80:80,3030:3030 -private 5900,0x21334ab7F3d1b549012498c69A4120DE2ff03E51
- On PC 0x2133...: diode -bind 15900:0xa334b4306bdc1c3cda9bf7781faa46f964213144:5900 socksd
- On PC 0x2133...: Start VNC Client and open “localhost:15900” and then type in the Pi user (pi), pass (<the pass>)
- On Pi: diode publish -public 22:22,80:80,3030:3030 -private 5900,0x21334ab7F3d1b549012498c69A4120DE2ff03E51
Configure the Diode CLI to always load at boot
This will ensure that if the Pi reboots, the Diode CLI interface will be up and running and ready for you to remotely administrate the system.
- wget https://diode.io/diode.service
- vi diode.service
- Just below [Service] add these lines to delay on startup and to restart the service every 24 hours
- Restart=always
- RuntimeMaxSec=86400
- ExecStartPre=/bin/sleep 60
- Update the “ExecStart” line to
- ExecStart=/home/pi/opt/diode/diode publish -public 22:22,80:80,3030:3030 -private 5900,0x21334ab7F3d1b549012498c69A4120DE2ff03E51
- Move diode.service to /etc/systemd/system/
- sudo mv diode.service /etc/systemd/system/
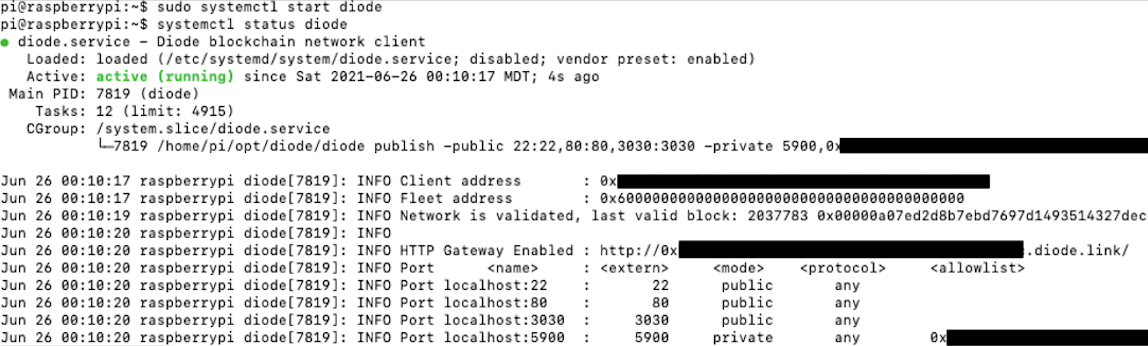
- Start it and confirm OK (you should see something like the picture below)
- sudo systemctl start diode
- systemctl status diode
- Stop it
- systemctl stop diode
- Enable it on boot
- sudo systemctl enable diode
- Created symlink /etc/systemd/system/multi-user.target.wants/diode.service → /etc/systemd/system/diode.service.
- sudo systemctl enable diode
- Restart the Pi and confirm everything works
- VNC from remote computer
- Start terminal on PC -> diode -bind 15900:0xa334b4306bdc1c3cda9bf7781faa46f964213144:5900 socksd
- Start VNC client -> localhost:15900
- SSH from remote computer
- Start terminal on PC -> ssh -o "ProxyCommand=nc -X 5 -x diode.link:1080 %h %p" pi@0xa334b4306bdc1c3cda9bf7781faa46f964213144.diode
- Enter SSH credentials
- VNC from remote computer
Install Additional Packages
Diode Drive running on Raspberry Pi requires a few additional packages due to the different Linux features.
- Install inotify-tools - this package installs a file / directory notification agent that Diode Drive relies on to trigger syncs when a file is added to a Zone or uploaded to the Pi via a web link / share.
sudo apt-get install inotify-tools
Invite the Pi as a Diode Drive Team Member
Adding the Pi as a Team Member will enable it to synchronize your files for any Zones it is invited to.
- From your computer, run Diode Drive and invite the Pi's Diode Drive account as a Team Member from one or more of your Zones
- On the Pi, either via VNC or via the LCD/keyboard/mouse interface, open Diode Drive and accept the invitations - the Pi should immediately sync all the files then iteratively keep everything backed up and available to other Team Members from there on out!