Vault Getting Started Guide
 Updated
Congratulations on your purchase of a Vault!

Your Vault is a pre-configured hardware device that can interoperate with one or more Diode App Zones to give them more storage capacity, keep them available to all team members, and to provide additional advanced capabilities.
This Getting Started Guide will walk you through how to setup your Vault for first-time use.
- Open the box
You should have received three things in the box containing your Vault: 1) The Vault, 2) An Ethernet Cable, 3) A Power Supply.
See the Vault System Interfaces article to learn more about the different interfaces on the vault.
- Scan the QR code on the bottom
Each Vault has a QR Code on a label on the bottom of the Vault. Please scan the QR Code to open a webpage showing you the Username and Client ID of your Vault. You will need the Username in the coming steps.
- Connect Ethernet and power up
Use the provided Ethernet cable to connect the Vault to an Internet-connected router or switch. Use the provided power supply to provide power to the Vault.
Once the power supply and Ethernet cable are connected, push the power button on the front of the Vault. The system will take from 30 to 120 seconds to startup.
- Add the Vault to a Zone
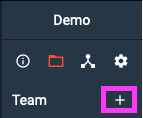
Have the person whose Username was paired with the Vault to open the Diode App and navigate to the Zone you want to add the Vault to. Click the "+" next to "Team" to open the Invite Team Member dialog:
Type your Vault's Username in the box and click "Invite":
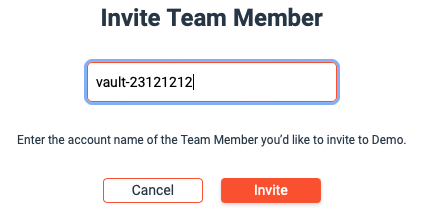
The invitation may take up to three minutes for your Vault to accept it. Once it has been accepted, you will see the Vault's online indicator in your Zone turn green, indicating it is online and is actively storing files, relaying chat messages, and more.
You can use this same process on each Zone you'd like to add your Vault to.
Troubleshooting
If something didn't work as you expected, please see the Vault Troubleshooting article for potential causes and fixes.