Tunneled (P2P) Dashboards
 Updated
A common IT, OT, and IoT need is for team members to securely access a remote dashboard for a piece of equipment (machine or server).
In the Diode App, Team Members can access a remote dashboard using a Bookmark. A Team Member's self-custody identity, or just their membership in the Zone, gives them end-to-end encrypted access to the dashboard.
This guide walks through an example of setting up Bookmark to launch a secure remote dashboard. It uses the following hardware and software:
- Device: Raspberry Pi 4 (Using Raspbian 32 bit Bullseye)
- Dashboard: Cockpit
- Diode CLI: v0.13.5
- Diode APP: v1.9.4
Device Setup
Let's assume you've been able to get your Raspberry Pi up and running and connected to SSH / VNC, or to a keyboard/mouse/monitor.
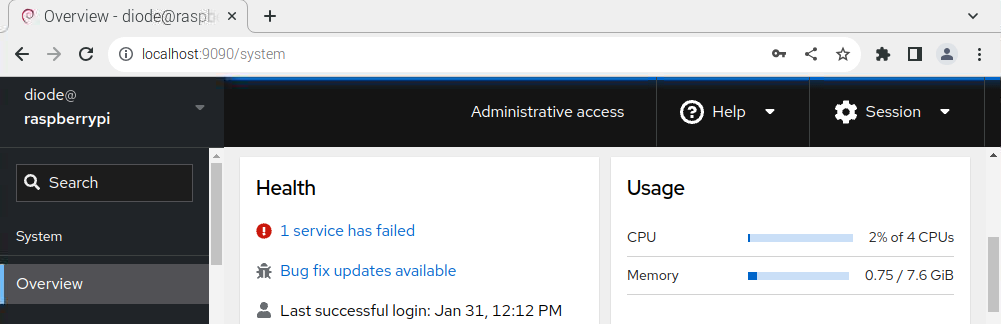
- Verify it is working by opening a browser on your Pi and going to http://localhost:9090
- You should see a login screen - you can type your Pi's username / password there to load Cockpit
- Install the Diode CLI (recommend using the curl command)
- Verify it is working by opening a terminal window and typing "diode time"
- You should see output with "Minimum Time" and "Maximum Time" like this:

- Copy your Client address - you will need this in the App Setup below
- For this example, let's pretend the Client address is 0xa5c8ee625db628b493b1d084afe25e962a570cd9
- After you've followed the instructions in that guide, you'll want to further modify the diode.service file to publish the Cockpit port
- Change this line:
ExecStart=/home/pi/opt/diode/diode publish -public 22:22,80:80,3030:3030- To:
ExecStart=/home/pi/opt/diode/diode publish -public 22:22,9090:80- That publishes your localhost port 9090 to your Web3 Client address' port 80
- Don't forget to change the
pito your Raspberry Pi's actual username, if you used a different username
- To:
- We will circle back to this step later on to make this a private linkage, instead of a public linkage (see Setup Restricted Access below)
App Setup
Let's assume you are already running the Diode App and have a Zone that you own and can configure. Additionally, we will use the Brave Browser to load the tunneled dashboard - you'll need to be on a desktop/laptop system and install Brave (see here for an FAQ on why we are using Brave).
- Type: Web3 Link
- Browser: Brave (Beta) (for now: 2024-02)
- Address: your Client address from step 2 in Device Setup (with a ".diode" suffix)
- e.g. 0xa5c8ee625db628b493b1d084afe25e962a570cd9.diode
- Click "Save" - the Bookmark should immediately show up in the Quick Access Bar.
- Try it!
- Click the bookmark - a message should flash across the top of your screen saying "Launching Brave" - the Brave Browser should launch and the login to your Cockpit dashboard should be displayed!
- Use your Pi's username and password to login - you should then see a screen that looks the same as the screen you saw on the localhost browser in Device Setup step 1:

Setup Restricted Access
For this step, you'll need to modify the Device settings to restrict access to only your App system.
- Find your App's Device ID
- Every endpoint in the Diode environment has a unique identifier/address called a "Client address" or a "Device ID" - you found the Client address for your dashboard device in Step 2 of Device Setup above. Now we need to find the same identifier for your desktop/laptop device you are running the App on.
- In the Diode App, click the profile picture/circle in the upper right corner and select "About"
- In the About page, find the Device ID listed under the word "Device:"
- For this example, we'll pretend your App's Device ID is 0xebf25e5b07abd13606a7e49be693b0031d83f2b5

- Change your diode.service file on your device to privately publish ONLY to your App's Device ID
- Open a terminal on your device (or SSH into it)
- Modify the diode.service file by typing
sudo nano /etc/systemd/system/diode.service - That will open the Nano editor. In the editor, find the line you edited in Device Setup step 3:
ExecStart=/home/pi/opt/diode/diode publish -public 22:22,9090:80- And change it to:
ExecStart=/home/pi/opt/diode/diode publish -public 22:22 -private 9090:80,0xebf25e5b07abd13606a7e49be693b0031d83f2b5
- That will publish your SSH port still publicly via Web3 and your Cockpit dashboard private to _only_ your App's Device ID
- Of course, modify the
0xeb...b5to be your App's actual Device ID
- And change it to:
- Try it!
- In your App, click the bookmark - the Brave Browser should launch and the login to your Cockpit dashboard should be displayed!
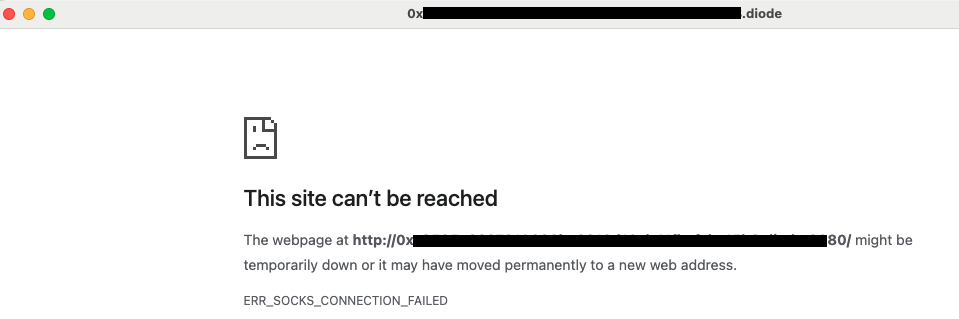
- Invite another user / device to your Zone (or setup a second profile) to verify they cannot access the dashboard - their App's Device ID will be different and will be blocked
- Have the other user try to load the dashboard by clicking on the bookmark. They will get a screen that looks like below (the network automatically blocks access from the device to anyone NOT in the allow list):
- Explore more!
- If you'd like your whole Zone to have access to the dashboard, or a sub-group from within the Zone, you can use private publishing via domain. Instead of specifying a Device ID / Client address in the private list, you instead specify a group that has been registered as a BNS name.
- A BNS name (aka "Domain") can be associated with as many Device IDs as you like. The Diode App's Network area provides an easy way to create and configure a Domain.
- The diode.service line could be modified to be, for example:
ExecStart=/home/pi/opt/diode/diode publish -public 22:22 -private 9090:80,pi-authorization-01- Where "pi-authorization-01" is a Domain that has an number of Device IDs associated with it