Configure Metamask
When you want to view the Diode Network from a browser, you can do so via the Diode Network Explorer.
If you have MetaMask installed as a plugin in the browser, you can use the Diode Network Explorer to manage certain aspects of the Diode Network. If you don't have it installed, you can still view information about the Diode Network, but you won't be able to manage it.
Let us know if you have any questions or suggestions for this content via Telegram!
Install and Configure MetaMask
- Install MetaMask - head over to https://metamask.io/ and get MetaMask from there. Once it is installed, it will show up as a little fox head in the upper right corner of your browser:

- Configure MetaMask to work with the Diode Network
- Open MetaMask by clicking the fox head - you'll see the interface with "Main Ethereum Network" showing in the network selector

- Click the colorful circle in the top right to view the Accounts list - you'll see "Settings" at the bottom of the pane - click the Settings selection

- Scroll to the bottom of the Settings pane - you'll see "Networks" there - click the Network selection

- At the bottom of the Networks pane, there is a selection to "Add Network" - click the Add Network selection

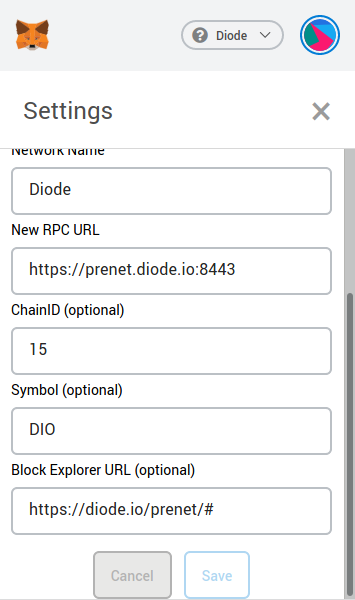
- Fill in the fields with the settings for the Diode Network:
Network Name | Diode |
New RPC URL | https://prenet.diode.io:8443 |
ChainID | 0xf |
Symbol | DIO |
Block Explorer URL | https://diode.io/prenet/# |
NOTE: ChainID should be entered in hexadecimal format as "0xf", but some clients may allow decimal "15"

- If everything worked out OK, you'll be taken back to the main page and "Diode" will be shown in your network selector.

You can now use MetaMask to create Accounts that can be used to manage your interactions with the Diode Network! We highly recommend keeping a backup of your wallet seed (Settings -> Security & Privacy -> Reveal Wallet Seed) so that you can restore your Accounts on MetaMask if you need to change computers.
